Network settings

Okay, you’ve got the settings page on display, which looks like the image on the right.
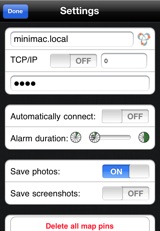
There are three things you need to configure before uAlertMe can connect to your Mac:
1. Hostname / Domain
The first field is where you enter the name, or domain that uniquely identifies your Mac. If you’re not wanting to connect to your Mac over the internet, then this only needs to be the Mac’s computer name (see Configuring your Mac).
If you are planning to use Bonjour (or Wide-Area Bonjour for the internet) to connect to your Mac, then make sure TCP/IP is OFF.
Version 1.2 of uAlertMe adds a Bonjour browse button. Tapping this will allow uAlertMe to browse the local network for any M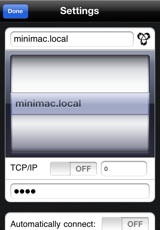 ac’s running iAlertU that have their servers running and visible via Bonjour.
If only one is found, it will typically be put directly into your Hostname field. If there are several, a picker will be shown, allowing you to pick one via a double tap. You will still need the correct password with which to connect.
2. TCP/IP or Bonjour
If you are planning to connect to your Mac via a TCP/IP socket, then you need to turn TCP/IP ON, and set the TCP/IP port to match the port number you specified on your Mac (see Configuring your Mac). Note that the valid range for the port number is 1 to 65535. Whilst this entire range is valid, some of the port numbers are reserved for specific services such as email, web browsing, etc. Picking a number between 60000 and 65535 should provide you with a port that is unlikely to cause any conflict with other services running on your Mac.
3. iAlertU Arm/Disarm Password
The last thing is the password you use on your Mac to arm and disarm it. Remember that this is case-sensitive, and cannot be blank (you don’t want anyone else gaining control of iAlertU, do you?)
