So, I’ve been working on the tvOS port of Tap Tangram (due out, March 17!) and have a few observations. As some know, I like to use Cocos2D for my apps; it gives me a huge degree of flexibility for building the UI and doing what I want in the app.
One of the things I’ve been doing in apps for the past year or so is providing a lot of configuration options for the player, and what I’m finding now is that the UI I typically build for this on iOS just doesn’t work on tvOS.
Tap Tangram Player Editor
For one thing, the focus engine on tvOS does not like to play with non UIKit buttons and so on. If I have a name field which tends to use UIKit under the covers, I end up with a single UIKit object on the screen, and the rest are my own Cocos2D buttons and switches.
Now, back before the new Apple TV went on sale, I put a lot of time into producing a focus engine for Cocos2D that mimics Apple’s engine (you’ll find it in the tvOS branch of Cocos2D v2.2 here). It works really well, and I’ve used it in both GALACTOBALL and Tap Times Tables. It’s not quite as clever as Apple’s one, but it works quite well and has a flexible API.
I’ve updated this API to work with the latest version of Cocos2D, and have been integrating it into Tap Tangram, however on this player editor, tvOS won’t play nicely because it wants you to do everything it’s way.
The end result is that the UITextField is given focus by tvOS even when I don’t want it to. Apple, for reasons of their own have made it really difficult to control the focus engine in our user interfaces. It’s all UIKit, or no UIKit, unless you can find some tricky workaround.
In this instance I have not been able to find a work around that is satisfying. It feels clumsy.
So what to do?
Write a brand new UIKit Player Editor, that’s what!
After mulling over my nice UI and wondering how to squeeze that tvOS square peg into my Cocos2D round hole I realised that even if I got it to work, my UI just didn’t make as much sense on the TV. I look at those switches, and I want to flick them. I look at the slider and I want to slide it. On tvOS, this just doesn’t make sense because it’s not a touch interface even if you are using the Siri Remote.
So I decided to start from scratch, and write a basic UIKit UI for the player editor.
As soon as I started to lay it out I discovered that on tvOS, some of the user interface features we know and love, are missing. There is no UISlider. There is no UISwitch. How was I supposed to put a toggle switch on screen if Apple haven’t given us one? I took a look at the Settings app on the TV. Pretty much everything is done via tables. Toggles are simple table cells that when clicked, toggle their state.
I can do that for all those switches, but what about the slider? Well, at the moment, it looks like I will have to implement this as a cascading picker so that when the user clicks on “Maximum Value” it will change to a simple picker. It means less flexibility for the user, but ease of use.
The up shot of doing it this way is that I no longer have to worry about the focus engine because tvOS will do everything for me. The down side is that I’m going to have this screen (or two) that although very functional and easy to use, it will not look in any way consistent with the rest of the app.
In summary…
So, either way I have to make compromises. Do I stick with my own look and feel, and find a way to make it work, or do I take the “easy” path, use UIKit and accept that it just won’t look as nice (in my opinion)?
I’ll continue to experiment as I move forward. Unfortunately, the main game screen of Tap Tangram is a really really complicated combination of scrolling areas, buttons, and tangram pieces that can flip, rotate and be moved. I can’t take the UIKit approach there, so whatever I do on the Player Editor screen, I’m still in for some fun.
I’m about to embark on a collaboration with another developer. We want to create something new and fun. One of the first things to crop up is the tools that we use. In the interests of documenting what I use, I thought I’d write it as a blog post for all.
One of the amazing things about software development is that we developers can be very passionate about what we use, and how we use it. Some developers love getting their hands dirty by doing all the hard stuff themselves. Some like the ease of point-and-click programming (and there are some of that wouldn’t call that programming, but we’re probably being snobbish).
Me? I’ve been around long enough now to have got my hands dirty on a whole bunch of things over the years. I started out with AppleSoft Basic on an Apple IIe, and progressed through a whole suite of tools and languages until the Apple IIGS was discontinued in the mid-nineties. I could go on about those days and the years between then and the current “App” development wave, but that’s not what this post is about (if you want to hear more about the “good old days”, then let me know via comments; if there are enough then perhaps I’ll take a stroll down memory lane).
I won’t attempt to compare what I use against what others use here; this is simply a write-up of what I use, and briefly, why.
I would like to point out though that this post is probably best for other developers, or budding developers. I will use terms and jargon here and there that won’t mean much to non-developers.
Programming
Perhaps it’s something to do with my age and where I’ve come from, but I like coding by hand. Don’t get me wrong, I’m happy for an IDE (Integrated Desktop Environment) to do some simple stuff for me, but for a lot of it, I’m more than happy to type things out from scratch. The act of typing in code, even what might be template code to others, connects me with what I’m doing; it’s an opportunity to construct the tapestry as I work, to think as I type. Having a lot of it done for me means that typically, I’m allowing the tool to dictate limits and sometimes, it’s own design, on what I am creating. Coding by hand means that the limits are my own.
For iOS App development, my coding environment of choice is Apple’s Xcode. This is a terrific, free, IDE that comes with absolutely everything a developer needs to code an app and submit it to the App Store. Now I say everything, and it’s true, but in reality there are things like images, icons, sounds, documents, etc that also help to make up an app, and creation of those falls to other tools.
Apple has traditionally encouraged the use of Objective-C for all development. Most developers either love or hate Objective-C. I actually enjoy it as a language. When Apple introduced Swift in 2014, I was a bit surprised. I knew that lots of people don’t like Objective-C, but I didn’t think people would be so happy to see a replacement. Swift has so far managed to fail to capture my attention. I have no desire thus far to change; Objective-C works, and works well.
App User Interface
Apple, for the iOS environment pushes it’s own UIKit and I’ve used this in several of my apps. It works well, and it’s very powerful. I don’t however like to use UIKit for the educational apps, and games that I create. For these I have used Cocos2D. I’ve been using Cocos2D since it was version 0.99. It’s now up to version 3.3. Most of my educational apps use version 2.2 of Cocos2D, though future apps will most likely use version 3.3 or later.
This GIT repository contains an entire Cocos2D project that I put together to demonstrate the use of Apple’s Accessibility API in conjunction with Cocos2D.
Going forward, Cocos2D is now integrated into a new IDE called SpriteBuilder, which is freely available at: http://www.spritebuilder.com, SpriteBuilder provides a very powerful environment that allows you to design the UI of your app in a way that can be built for both iOS and Android. I have yet to test/try the Android side of things, but feedback from other developers who have used Apportable which has been integrated into SpriteBuilder, has been very encouraging.
SpriteBuilder creates, from your design, and entire Xcode project that you can then add code to, and build for submission to Apple. They integrate well, and the powerful thing is that once you open up the Xcode project, you can forget about SpriteBuilder if you choose and hand code the rest of the app. I really is, for me, a good blend of the two.
If I’m building a UIKit app, then I do everything in Xcode.
Code Management
When I first started working with Xcode, I used “cvs” to manage and control the various versions of my code. It worked well, but in the years since then, the development world has moved on. These days, the trendy choice is “git”, and for me, it’s a good choice. It works well in a local environment, and I’m able to set up remote environments so that I can easily backup my code to a file server, or the cloud.
For code version control using “git” I used SourceTree, by Atlasssian. SourceTree is available for free from: sourcetreeapp.com It’s a great tool, very powerful and integrates beautifully with a cloud based service called BitBucket, also by Atlasssian. I use BitBucket because I can create unlimited private repositories for free, and it’s very handy for sharing code with other team members. I use SourceTree on my Mac to manage daily commits of code, and then push those commits to the cloud or a file server periodically so that I have backups.
Artwork
For a lot of my apps, I’ve created most of my own artwork. Until late last year I did all of this using a free app called “GIMP“. It’s a great tool, and for people, like myself, who work on a very low budget, it works well. It’s cross platform and there’s even a version on iOS called ArtStudio (though they don’t call it GIMP, when you look at it’s feature set, and menu structure, I’m convinced that’s it’s built from a GIMP codebase).
With the new version of Money Up, I moved to the Adobe Creative Cloud suite, and Photoshop. Whilst I enjoyed GIMP and became proficient using it, I now really enjoy the power provided by Photoshop and the higher quality outputs achieved by using Vector based shapes for the drawings. GIMP is a raster based editor, and as such, is unable to export cleanly scaled images in the same way.
Sound and Music
Before I mention the tools I use on my Mac to edit sounds and music I want to mention two websites I use to source most of my sounds and music:
incompetech.com – This is a wonderful site by Kevin MacLeod who shares a vast library of his original royalty-free music. I’ve used a number of pieces from this site; the ability to browse using a terrific filter makes life much simpler.
freesound.org – This site is a powerhouse, full of sound recordings. Be careful to observe the licenses attached to individual recordings.
For most of my sound editing, I use Audacity, a free and yet, very powerful sound editor. When I needed to clean a large number of sound recordings for Money Up however, I used Audition CC, part of the Adobe Creative Cloud suite. For me, it’s not as intuitive as Audacity however it’s very capable, and some things are easier to do.
I always export my sounds as “AIFF” files, but I don’t use those within the apps that are submitted to Apple. Most apps don’t need high quality sounds, especially for simple sound effects. What I do, is run a short script over all of my “AIFF” files, to convert them to “CAF” files which take up less space, but still sound just fine on an iOS device.
This script comprises:
#/bin/sh
FILES=`find . -name \*.aiff`
for F in $FILES;
do
  DF=`basename -s .aiff ${F}`
  echo "Converting ${F} to ${DF}.caf"
Today, after what has seemed like an eternity of waiting (it wasn’t but it seemed like it), Apple kindly approved the latest update to “Dollar Up”. The app is now called “Money Up” and it has taken on a whole new look.
With the invaluable help of Ben Lew of Pi’ikea St, the app has been completely revamped. The user experience is smoother, and to top it all off, now sports 5 wonderful, friendly characters:
From left to right, they are: Grace, Sparkles, Ted, Zilla and Pirate Joe.
For a brief preview of the new Money Up, watch this video:
“One More”… is no more…
For those people that have purchased “One More” in the past and would like to enjoy the new Money Up app, I’m willing to offer a free promo code for Money Up if you can provide me with proof of purchase.
One More was originally created in an attempt to make Dollar Up more “searchable” for people in the UK that might have been put off by the icon and the word “Dollar”. Now that v2.0 has been released, and the emphasis on the “Dollar” has been taken away I’ve elected to discontinue “One More”.
As I said above, if you’ve previously purchased One More, then please send me proof of purchase (either a receipt from Apple, or a screenshot of the main menu) via email to support [at] pkclsoft.com and I will send you back promo code for Money Up.
It’s been a busy couple of months since Apple released iOS 8, the new iPhone 6 and 6+, Yosemite and … hold on, this post is supposed to be short. If I list everything that Apple announced, I’ll be here all day!
On with it. Since Apple’s big event, I, like most other active app developers, have been very, very busy. I’ve been working away at a new app for special needs education, and a complete rework of my first special needs app, Dollar Up. I’ve also had to update all of my apps to be sure that they work on iOS 8.
As if that wasn’t enough, I’ve also written another new app called 9 Letters which is due to launch this Thursday, the 20th of November. 9 Letters is all about letting the inner word searcher go mad. If you like Scrabble™ or Boggle™, or just about any other word game, I think you’ll like 9 Letters.
One of the really neat features of iOS 8 and Yosemite is Continuity. I love it; it brings to the Apple devices a wonderful synergy where they work together to become a single powerful tool that anyone can use. No more do we have to close a document, save it somewhere special and then reopen it on another device in order to continue our work. We can now just Handoff the document, in it’s current state, from one device to another.
When I was nearing completion of 9 Letters I realised that the game would benefit from this neat feature in iOS 8, so with a remarkably small effort (Apple really made the process very easy) I added Handoff to 9 Letters, and I love it.
Now, when I am on the train home from my day job I can play a game of 9 Letters on my iPhone, and then handoff the game to my iPad when I get home. It really is great.
Below is a short video I recorded tonight that tries to demonstrate just how great this is. I hope you enjoy it. I also hope that other developers get behind Apple with Continuity and all it offers; working with computers and mobile just got even easier.
With the advent of iOS 8, Apple has added what it calls “App Previews” to the App Store so that developers can showcase their apps with an up to 30 second video of their app.
These videos are supposed to be simple screen captures, with perhaps a little post editing done in an application like iMovie. They are not supposed to be anything more than that. With that in mind, Apple have made it pretty easy to record your App Preview and upload it to iTunes Connect.
Even so, it seems that some people are still struggling with what tools to use, and how to get a file that they can upload that meets Apple’s rules.
The main things you need to take into consideration are:
The video must be less than 30 seconds in duration.
The video must be less than 500mb in size
The video must be the correct resolution. For this, the resolution depends on the device class you are submitting the video for. When I submitted my videos, the iPhone 6 had not been released so I had only to create videos for the iPad and iPhone 5. Apple don’t allow us to create App Previews for the iPhone 4.For the iPad, videos must be 1200 x 900 pixels
For the iPhone 5, videos must be 1136 x 640 pixels
Before you start – ingredients
For any act of creativity, be it cooking, or recording an App Preview, you need the right ingredients. For me, I use:
Mac Mini running the latest OS X Yosemite.
iPhone 5 or iPad Air.
Lightning to USB cable.
Quicktime Player application (part of Yosemite) for video capture.
iMovie 10.0.5 for video editing.
Handbrake v0.9.9 x86_64 for final video encoding and cropping.
Capturing the raw video
Apple clearly states that if you install OS X Yosemite, and connect your device via USB cable, you can use the Quicktime Player application to capture the video in it’s rawest format.
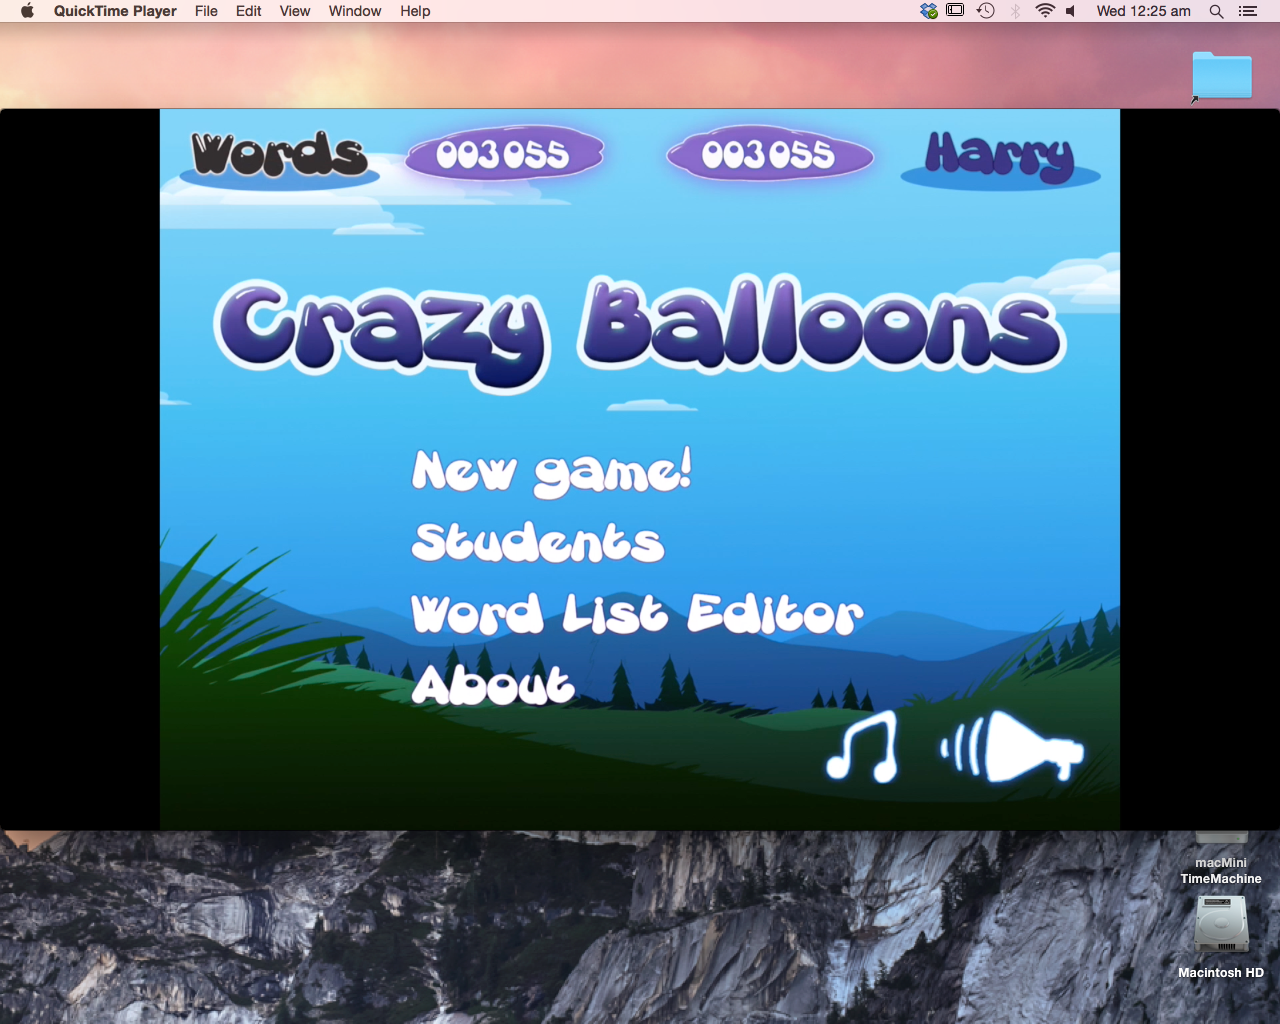
This is actually, really easy. Once you have your device (for me either an iPad Air or an iPhone 5s) connected, run Quicktime Player.
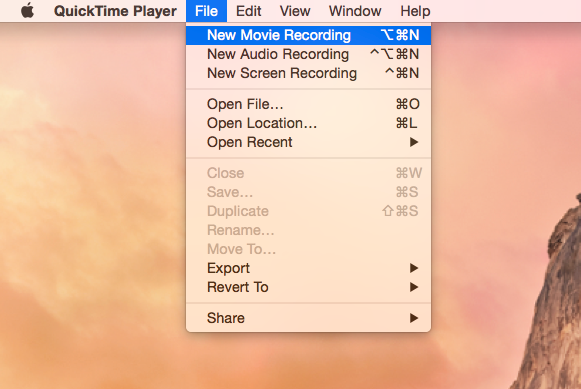
If you’re lucky, Quicktime Player will automatically find your device and you’ll see the devices screen pop up in a window on your Mac. If not, from the File menu, select “New Movie Recording”:
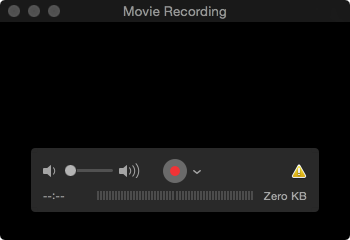
This will, if it still doesn’t find your device, open a window that looks like:
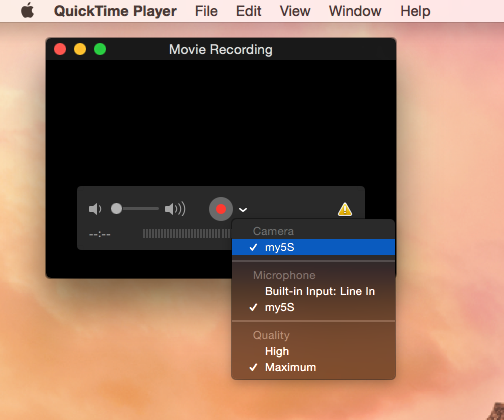
Within this, click on the down arrow next to the record button, and ensure that your device is selected. Be sure also to make sure that your device is also selected as the “microphone”. This is important so that any sound your app produces is also recorded along with the video.
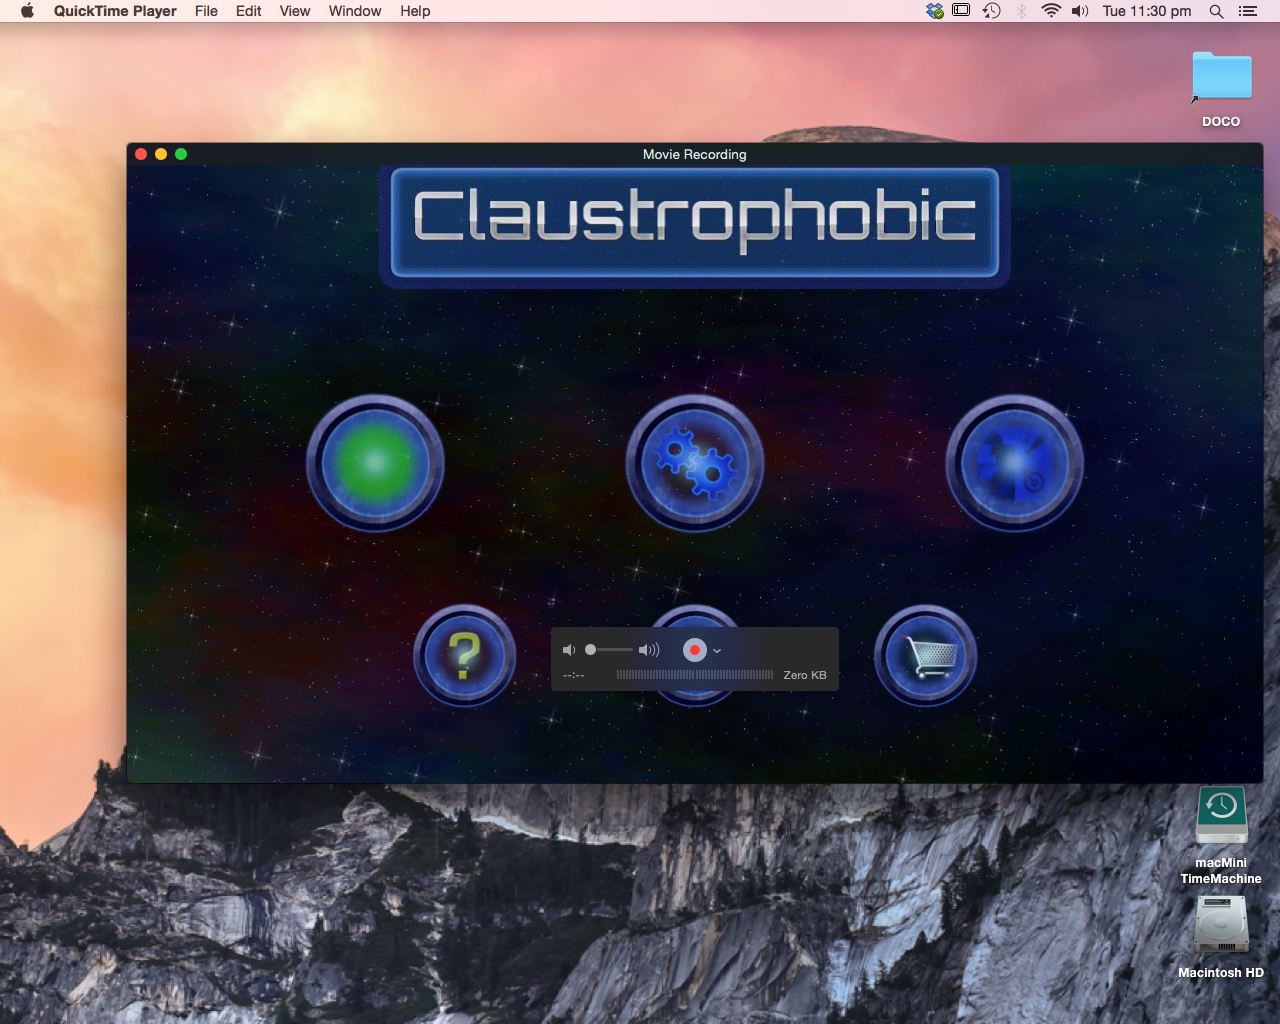
Once you’ve done this, you should see your devices screen within a window on your Mac:
So now all you need to do is click on the record button, and then use your app while the Mac records everything you do. Be sure to have a script to follow so that you cover everything you want to show off about your app within your App Preview. Apple has a great podcast within the WWDC 2014 collection that covers this sort of thing.
TIP:
If your app has background music, turn it off before you record your video. It will be much easier to add the music to the edited video later on. In all likelihood you will end up chopping your video up into pieces and rearranging things to make best use of the 30 seconds. When you do this, any sound that is running along in the background also gets chopped up and ruins the continuity of the video. I’ve learnt this the hard way.
Once you’ve finished playing with the app, click on the record button to stop recording.
You then need to save the recording to somewhere suitable from the File menu in Quicktime player.
Editing your video
Now that you have your raw video (I like to name them with the word “raw” in the filename for clarity), you need to edit it, and turn it into a 30 second masterpiece complete with any flashy effects, music or voiceovers. For this, I use iMovie. It’s actually a pretty decent movie editor and I find that I can do most things I need within it. There are other far more capable video editors available, but for me, iMovie works well.
I won’t go into too much detail on how to use iMovie to do the editing, but I’ll address those issues that are important to getting your video ready for iTunes Connect. Here are the basic steps I follow:
Start off, by starting iMovie, and creating a new event for your App Previews.
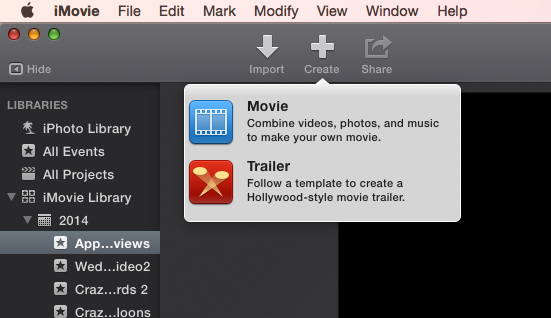
With the new event selected, click on “Create” button and select “Movie”, and then select “No Theme”.
Click on “Create” and enter an appropriate name for the project. I tend to follow a convention where if my raw file is “Appname Phone raw.mp4”, my iMovie project is called “Appname Phone IM”.
At this point you have a blank time line. Drag your raw video file into this timeline and get creative!
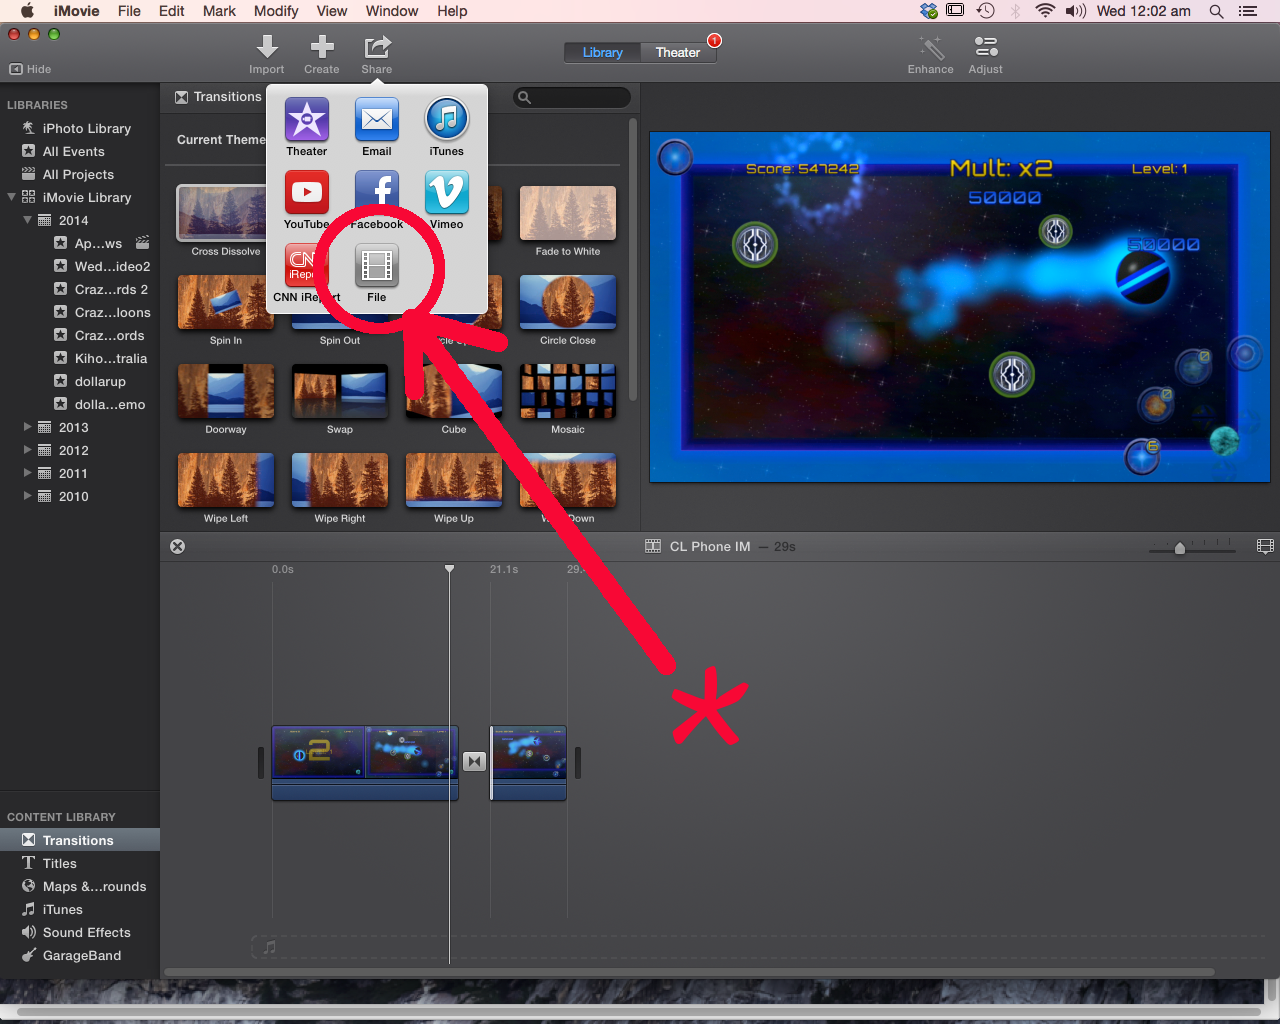
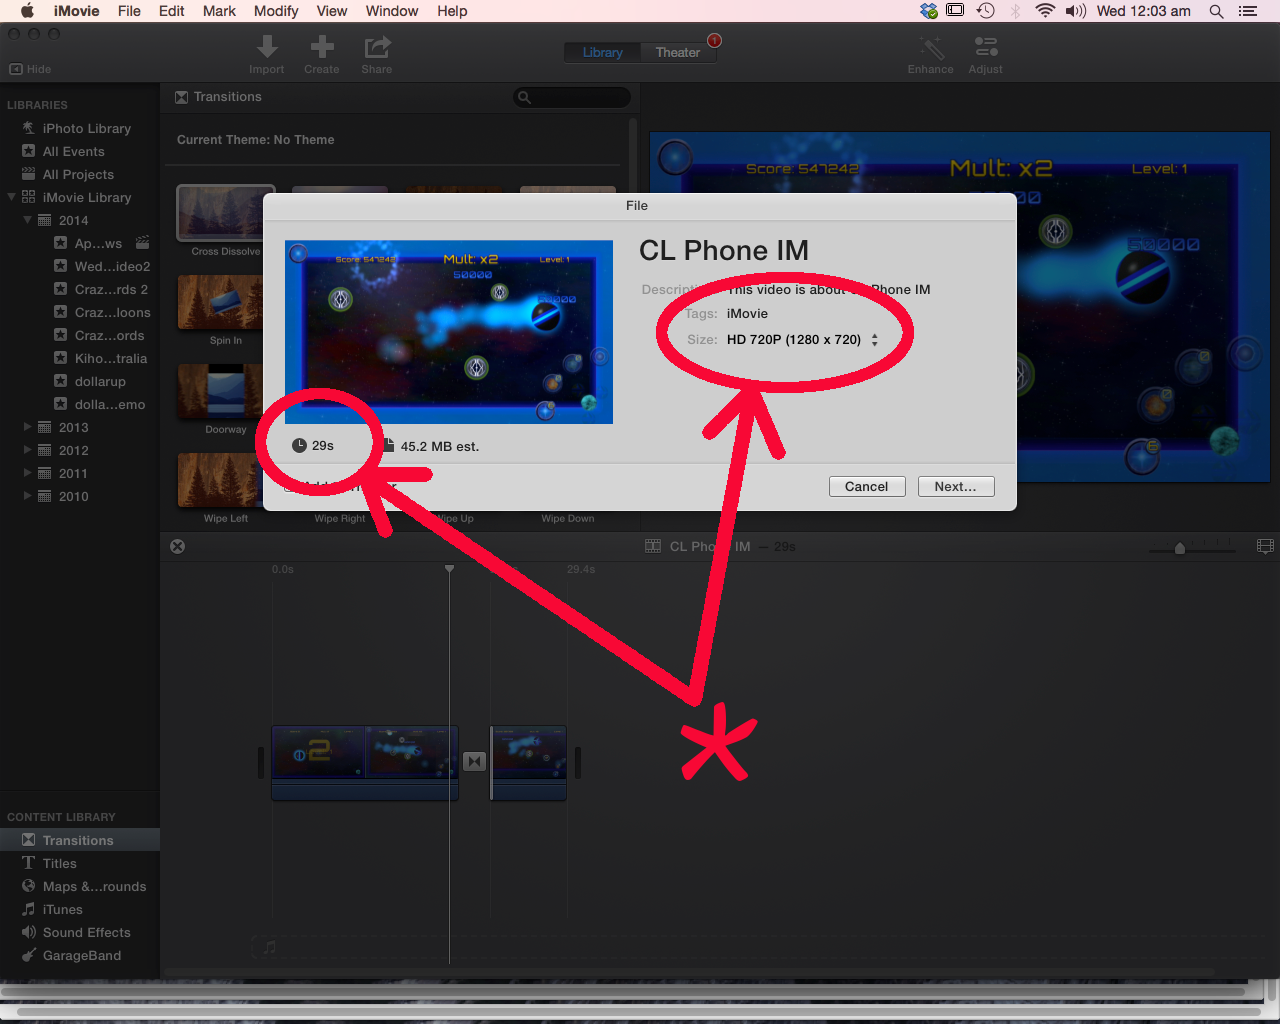
When you’re happy with your 30 seconds of blockbuster video masterpiece (be absolutely certain it’s less than 30 seconds!) it’s time to export the project to a file. Click on “Share”
Next you are prompted to name your video file and select the resolution. For an iPhone 5, it is vital that you select “HD 720P 1280 x 720”. For an iPad, select “HD 1080P (1920 x 1080)”
That is the end of the iMovie phase of the project. You can now close iMovie if you are feeling confident.
Final Step – Encoding and Cropping
As I mentioned earlier on, Apple have very specific requirements about the resolution of the video you upload for an App Preview. To reiterate:
For the iPad, videos must be 1200 x 900 pixels
For the iPhone 5, videos must be 1136 x 640 pixels
So what gives, Apples own tools don’t give us a video that matches these at all! Using Quicktime Player and iMovie we end up with:
1920 x 1200 instead of 1200 x 900, and
1280 x 720 instead of 1136 x 640
Well, as it turns out, the resolution of the iPhone 5 video is almost the exact same aspect ratio as what Apple requires, and we can scale the iPad video such that we get the full height, and then crop the sides to get the exact video resolution we want.
Don’t understand that? Don’t worry, I didn’t at first either; it took me a while to realise that I needed to scale the videos from iMovie to fit what Apple wanted. For the iPhone this is trivial, but for the iPad scaling wasn’t enough because it left ugly black bands down each side. Here is a screenshot of an iPad video I produced in iMovie a week or two ago:
How do we fix this? I use a wonderful tool called HandBrake (http://handbrake.fr). This great application which runs on OS X, Windows and Linux is a free video transcoder. It has a wealth of features and does what we need beautifully.
One great feature of HandBrake is that you can create a “preset” which describes how you want your output to be encoded and sized, and then save that preset for later use. I’ve done this for both the iPhone 5 and iPad App Previews, and this has worked perfectly for me every time.
One huge benefit is that the quality of the final video is great, and it’s also very well compressed. You can probably tune things but for me these presets work.
So, start up HandBrake, and from the “Presets” menu, select import to import the presets I’ve provided below:
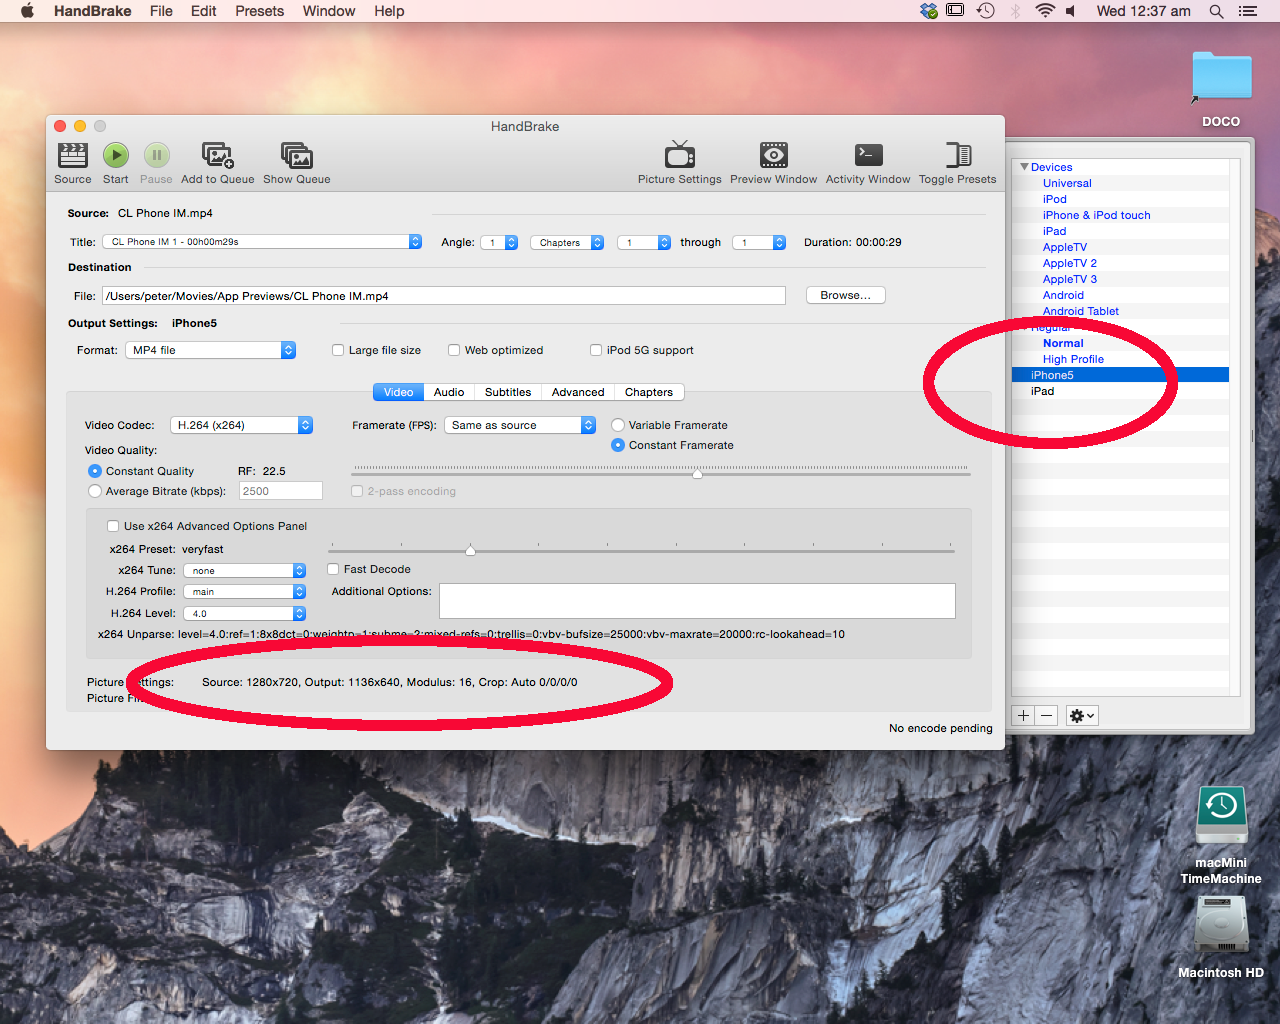
Now, drag the video you saved from iMove onto the Handbrake main window (or select it from the “Open” dialog) and you should see all sorts of details about your video:
Note on the side in the Presets “drawer”, I’ve selected iPhone5? This is one of the presets I’ve made available above.
Note also at the bottom where you can see the resolution of the source video (the one from iMovie) and the resolution of the output (what you have to upload to iTunes Connect). The output is exactly what you want.
All you need to do now is click on the “Start” button and wait for HandBrake to tell you it’s finished.
You’re done! You now have a video in the correct format, duration and size for a direct upload to iTunes Connect. Remember that you need to do this with Safari on a Yosemite Mac (as far as I know).
This is a short post today. The purpose of this post is to share a link to an Xcode project I’ve put together containing the accessibility code I wrote for Dollar Up. This code allows a developer writing an app with the popular Cocos2D project to interface their app with Apple’s UIAccessibility API. It’s fairly painless to use and I’ve found it very easy to integrate into Dollar Up.
The aim of sharing this code is to help make it easier for other developers to make their apps Accessible.
Here is a link to the repository. It’s a bit bare bones at this stage, so if you have suggestions or find problems feel free to fork or branch.
There seem to have been a number of blog posts of late talking about how difficult it is for indie developers to make a sustainable income from their apps. The app store has evolved over the past few years, and not all of us developers have managed to find that pot of gold.
For example, I consider myself an indie developer, though I don’t try, and never have tried to make a living from my apps. Yes, it would be nice to be able to, but I’ve not managed to create any of those app store hits, and I didn’t enter this game early enough to establish my ‘brand’ before the app store became crowded.
With a few exceptions, I’ve focused my attentions on kids educational apps. It’s what I enjoy writing. I know that, even though my apps might not be runaway successes that are loved by all, they are loved by some, and that’s good enough for me. I know that my apps are used regularly by some people; maybe not a lot of people, but by some. I want my kids educational apps to be fun, and helpful; it’s what got me started when I wrote Tap Times Tables.
Early on in this adventure I discovered the Moms With Apps forums where I found other developers. I was looking for help because whilst I knew how to write an app and make it work, I had no idea on how to market it or sell it. I know a lot more now, and that is largely because I found Moms With Apps. The people there, especially the team, headed at the time by Lorraine were so helpful, and through them I discovered “AppFriday”.
“AppFriday” has been, for several years now, an opportunity for developers of kids and family friendly apps to promote their apps at a discount, or for free in attempt to gain more visibility, connect with customers, and hopefully increase sales.
What many of us have found is that AppFriday has been very successful overall, however there has always been an undercurrent of wishing we, as developers didn’t have to mark our apps down so much so that we could not make enough income from them to keep developing. For some time now I’ve tried to avoid setting my apps to free, only doing so when combining it with other promotions, or when I was basically desperate enough for a sale that going free wasn’t going to lose me anything.
Most of the times I set my apps to free, I would see a little kick, but that would only last a day or so. So whilst AppFriday was helpful, it didn’t produce any big sales numbers.
Something that a number of developers have been noticing for a while now is that the number of people turning up for AppFriday has dropped off, and that when an app is set to free, there have been some unusually large educational volume purchases. I can speak for everyone here, but in my case, I set Tap Times Tables to free on the 25th of April. Leading up to that date I was making roughly 1 or 2 educational sales each week. Since that date, I’ve had one single educational sale of Tap Times Tables in the US.
As the images show, educational sales in the US prior to setting the app to free on the 25th of April were a significant proportion of my sales. Since then however that has changed dramatically.
This observation (and I am not the only developer to make it) plus the oft mentioned race to the bottom for prices has led the AppFriday team to try something new. When AppFriday went on hiatus for the Northern Hemisphere summer break, the team sought some feedback from developers on what we wanted to do when the hiatus was over. Did we want to continue with AppFriday in it’s present format (i.e. discount or free promotion only) or did we want to try to try something new?
Well, as I just mentioned, the decision was to try something new. As of the 1st of August 2014, AppFriday has changed to a new format where the only apps that are promoted are apps that meet the guidelines shown at: http://www.appfriday.com/About
Now, instead of promoting discounted apps, we are promoting quality apps that have been Handcrafted for use by kids, that are family friendly, and safe to use. This new emphasis is an attempt to shift the focus of customers so that they will hopefully place some value on the apps that they purchase. We want people to buy our apps because they meet a need; that they are fun, friendly and helpful. Getting people to download something just because it is free or discounted heavily doesn’t encourage buyers to value the apps or what they can do for their kids.
It is also an attempt to return to the days in the app store when you had a new app and actually had a way to let people know it. When many of the developers in the Moms With Apps group began this journey, Apple provided a space in the “New and noteworthy” area of the app store. This gave customers a way to see the new apps, regardless of who published them.
The “Best New …” area in the app store these days is not actually a list of “new” at all; it’s a curated list of what is selling well. Sometimes there are new apps in there; but most of the time the apps there are not actually new. People like to see new, shiny things on the shelf; even if it’s just to take a look and consider whether they want it. This new AppFriday is our effort to give you a new way to find the new apps, and the freshly updated apps for your family and your kids.
So this Friday, when you see developers and other people on Twitter using the #appfriday hashtag, take a real look at the apps. See if there is something you need. Are your kids struggling with their Times Tables? Do they need help with spelling? Do they need a fun distraction like colouring in, or playing with concepts such as recycling, body parts, reading, etc?
And, if you do purchase an app, and you like it, don’t be afraid to pop into the App Store and post a review to let the developer know. Reviews make a big difference. Even if you don’t like something about an app, the developers would love to hear from you via email (most of us provide links to support sites).
Dollar Up is now just over 2 months old. As a developer I’m especially proud of this app, not so much for what I’ve done within it technically, but for what the app can do for people.
The main reason I wrote Dollar Up was to help out. A teachers aid/assistant wrote to me and asked if I was in a position to write some apps for Special Needs students. Whilst I wasn’t able to do everything she asked, I was quite excited at the prospect of writing an app that had the potential to really make a difference.
So I came to an agreement with the teachers aid who provided a lot of input into the initial design and layout of the app that I would build it at no cost to her or her school, and provide her with as many copies as she needed. I got to own the app itself, and consequently any proceeds from sales.
Over the next 3 months I spent most of my development time (which means spare time as this is not my main job) putting Dollar Up together. My understanding was that there was a genuine need for an app that helps to teach basic money skills to people with learning difficulties such as Down Syndrome or Autism.
This was to be my first foray into Special Needs education. Over that first month I learnt a lot about what makes an app easier to use for people with special needs. Make buttons bigger, allow students an option to retry a question, etc.
One huge lesson was that my perception of what people can grasp and understand was centred around my own experiences. That is to say, I had no comprehension of just how much I take for granted in this world. The simple fact that some students couldn’t be expected to grasp or learn concepts like numbers over 10 rocked my world. More than one night I’d get an email explaining this sort of thing to me, and I’d turn to my wife, shaken and unable to get on with the programming. It takes time to absorb this sort of thing for me. Whilst I’m by no means the smartest guy out here developing apps, I’m so used to being able to do these simple things, that comprehending just how ignorant I am of those around me left me more than a little upset.
This learning experience did one thing; it galvanised my desire to do this app, and do it well. I wanted to make a difference, to help fill a gap in the app store, and provide Special Needs teachers around the world with a tool they could use.
In the past, with one notable exception, I’ve done all of the work on my apps; the code, the artwork, the sounds, everything. I work to a shoestring budget. Some say that my apps suffer from this; that if I spent the thousands they do on artwork I’d do better. They may be right. With Dollar Up, I decided to use my little income from the other apps in my portfolio to pay for voice work, and some artwork.
Initially Dollar Up was just for Australia, but it became clear that there was a demand for it in other countries as well, so I started researching where to get permission to use images of coins and banknotes from other countries. In some cases, like the UK and Canada, this proved to be a long process involving a number of emails and in one case phone calls to sort things out. Eventually I had the permission I needed. I never set out to make much money from Dollar Up so it was important that the various institutions understood that.
At release, on the 7th of February, Dollar Up supported 7 lessons with 5 currencies (Australian, US and Canadian Dollar, UK Pound, and Euro). A week later, I added a 6th currency (New Zealand Dollar) because I’d heard via @TheAppyLadies that there is a strong Special Needs community there. Since then, there have been 2 more updates, adding at least 9 new features the most recent of which is the ability to extend the app using the iPad’s built-in camera.
During the last few weeks prior to the first release, I distributed Dollar Up to over 30 beta testers around the world. This was invaluable, not just for fixing things and improving the app; it showed me that people really were looking for an app to help them teach their students or children money skills. It heartened me and confirmed to me that I had done the right thing taking the time to write Dollar Up.
On the day the app was released I remember having a coffee with my wife. During that coffee my phone was buzzing away with messages and tweets showing support for the app. It was an affirming moment for me.
In all of this my expectation was that by supporting all of these currencies I would see some interest from the key markets of Australia, US and UK. Whilst I included the Euro as a currency, I didn’t expect a lot of interest from Europe because the verbal/audio feature of the app is English only.
One thing to note; if you work with currencies other than “Dollars”, don’t let the name of the app put you off . If you select Pounds or Euros as your currency, then the app will intelligently use the correct terms through all of the lessons, both on screen and via the audio prompts.
What has surprised me the most is that the UK has proven to be the quietest. As the graph to the left shows, the US is by far the strongest market, but the UK falls into the bucket at the bottom.
Sales haven’t been huge, but I never expected them to be, and it’s not why I wrote the app in the first place.
I had however thought that the spread of sales would be more uniform. My hope with this post is that by telling the story of the apps development, I can try to give it a human side. I’d very much like to reach more people and schools with Dollar Up; I want it to help. If people don’t know it’s there, they can’t use it and it can’t help.
If you represent an English speaking school that uses, or wants to try the “Next Dollar Up” method to teach money skills then perhaps “Dollar Up” can help. If you’d like a promotional copy of Dollar Up to try, please write to me at support@pkclsoft.com. Explain which school you represent, what your needs are and if I can I’ll help out with a free copy or two. Of course, I only have limited numbers of these so I’d really prefer to provide them to schools where the potential to reach more students is higher.
I’m pleased to say that I’ve just submitted to Apple for review, my latest app. This app has been written at the direct request of an Australian teacher to help her teach her students the “Next Dollar Up” technique.
Below, I’ve included a youtube video trailer for the app, just to whet your appetite. If you’d like to know more about the app, please contact me for some information via the support page.
Game Centre integration is on the way out for two of the PKCLsoft apps.
Today, updates for both Tap Times Tables and Math Plus Minus were rejected by Apple.
The reasons given were that both apps have links that can take the user out of the app. With the new “Kids” category that is coming out with iOS 7, any apps that want to be included in that area have to meet new, tighter rules.
One of those rules is that your app can’t have links that take the user (the kid) out of the app, unless there is a “gate” that can typically only be opened by a parent or adult.
As the kind people at momswithapps.com have pointed out here, there are different ways to implement a “gate”.
Now I can understand where Apple is coming from, so I’m acting accordingly. I’m removing Game Centre from both apps completely.
I don’t want to leave it in and put a “gate” there because it just doesn’t make sense from the kids point of view. If all s/he wants to do is look at his score, then asking for a parent to open the gate doesn’t make sense; it’s unwieldy.
So, the question I asked myself (and this was also asked in a way by Lorraine at momswithapps.com): “Does Game Centre really add any value to the apps?“
When I look at the apps in Game Centre, the number of players is only a small proportion of the total number of people that have downloaded the apps so perhaps it’s not such an important thing.
Encouraged by this, and also driven by the need to correct the issues for Apple, I’ve acted to remove Game Centre.
If you use either of these apps, and are upset by this, please let me know. If there is enough demand, I can look into adding it back in, in the future, and add a gate.


 What has surprised me the most is that the UK has proven to be the quietest. As the graph to the left shows, the US is by far the strongest market, but the UK falls into the bucket at the bottom.