Configuring your Mac

In order to allow uAlertMe to connect to your Mac, you need to be running iAlertU v0.71 or later. If you don’t already have this version, you can download it for free from http://sourceforge.net/projects/ialertu/.
Once installed and running, you need to configure a couple of things within iAlertU:
-
1.Arm/Disarm password
To help you protect your Mac, iAlertU will not allow a connection from uAlertMe unless you know the correct arm/disarm password. As such, you need to configure this password within iAlertU on the General tab of the preferences panel (see below).
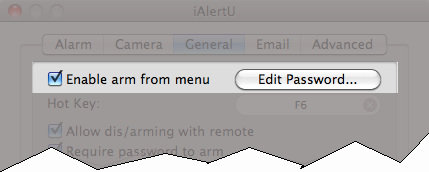
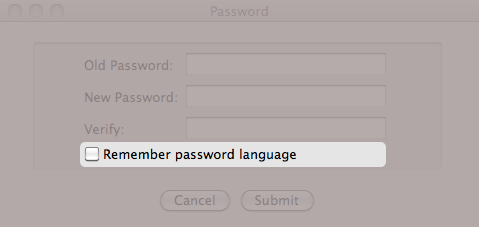
Clicking on “Edit Password” will allow you to specify the password. Be careful in this situation not to tick the checkbox in the password dialog.
-
2.Configure the uAlertMe interface
uAlertMe requires a way to connect to your Mac. For this, you need to configure iAlertU to run a small server that will listen for connections from uAlertMe. This server uses can use Apple’s Bonjour service to advertise itself, or if you prefer, it can use a simple TCP/IP socket. If you are wanting to connect to iAlertU over the internet, then you will need to have your Mac configured with a static IP address, or have it configured to use Dynamic DNS. Bonjour works very easily on a local network, however getting it to work over the wide-area network (the internet) can be problematic.
Within the iAlertU advanced tab, there are several settings or preferences that you need to configure. If you have already read about configuring uAlertMe, you’ll recognize that these mirror the connection settings there.
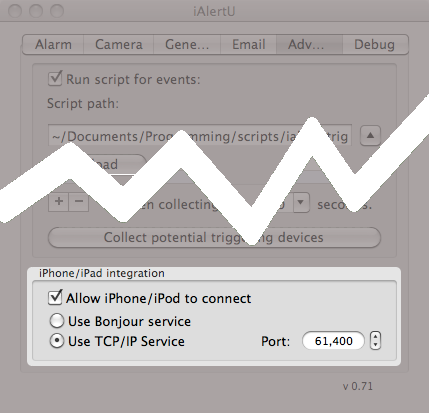
Ticking “Allow iPhone/iPod to connect” will turn the server on, using whatever settings are below. Any changes to the settings will cause the server the disconnect from uAlertMe, requiring a new connection to be established. If iAlertU is armed, then the server cannot be turned off or altered; this is to ensure that a thief can’t stop you from accessing your Mac via uAlertMe.
Ensure that, if you are using TCP/IP, the port number matches exactly, the port number you’re using in uAlertMe.
-
3.Configure your Mac’s sharing preferences
For all of this to work easily, you need to tell your Mac to allow iAlertU to run it’s server, and you need to tell the Mac how to advertise itself on the network.
For this, you will need to open the System Preferences application your Mac, and select “Sharing”. With this selected, click on “Edit” to edit your Mac’s computer name.
This will open a dialog such as:
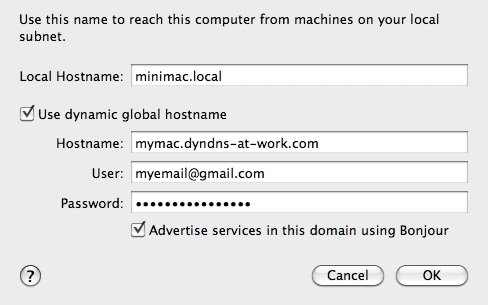
In this dialog, the “Local Hostname” contains the value you would use if you want to use uAlertMe to connect over a local network.
If you want uAlertMe to connect over the internet, then you will either need a static IP address for your Mac, or you will need to set up a dynamic address via a website such as http://www.dyndns.com/.
If you are using dynamic DNS, then tick “Use dynamic global hostname” and configure the “Hostname”, “User” and “Password” fields as per your dynamic DNS account.
For help with creating an account with dyndns.com, I recommend reading the blog at: http://www.maclife.com/.../how_set_dyndns_your_mac as it provides a very good step-by-step description of how to create a free account, and configure your Mac to use it.
One thing to note is that whilst the Mac apparently supports the use of dyndns, it is better to install the “DynDNS Updater client” described in the above blog. Whilst in theory your Mac shouldn’t need their client software, in my experience it does.
If you want to use wide-area Bonjour for this dynamic DNS address, then tick “Advertise services in this domain using Bonjour”. In addition to this, you will need to set up a “Standard”, non-free account with dyndns.com. I refer you to http://www.dyndns.com/ for more information on how to set it up.
-
4.Configure your Router / Firewall
For your Mac’s uAlertMe TCP/IP port to be accessible when your Mac is at home, you need to make sure that your router is configured to allow incoming connections on that port, and that they should be “forwarded” to your Mac. In my experience this requires that your Mac have a static IP address assigned on the local network, and that the router be configured to direct incoming connections on the uAlertMe TCP/IP port to that same static IP address.
Routers come in all sorts of packages these days, but most provide the ability to forward packets, and the mechanism they use for this is “Port Forwarding”. Again, for a great step-by-step explanation on how to configure your router to forward the uAlertMe TCP/IP port, please visit: http://www.maclife.com/.../how_remotely_monitor_your_transmission_torrent_downloads.
So long as you have followed the guidelines provided above, your Mac should be ‘visible’ on the internet, and thus available for connections from the iPhone. Hotspots, and internet cafe’s should not require any special configuration on your part.
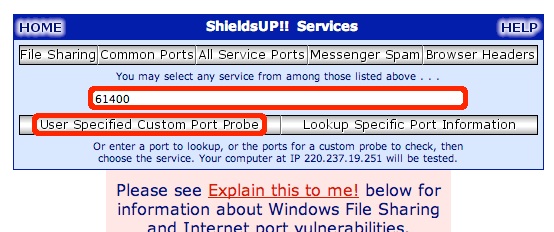
If you want to test to see if your uAlertMe TCP/IP port is visible, then I recommend visiting http://grc.com where there is a terrific tool called ShieldsUp. Using this tool, you can request that it scan your Mac for open network ports. There are a lot of very useful options with ShieldsUp, but for the purpose of testing the uAlertMe TCP/IP port enter the port number into the text field and press “User Specified Custom Port Probe” as highlighted in the image below:
Having done this you should get a report stating that the port is open:
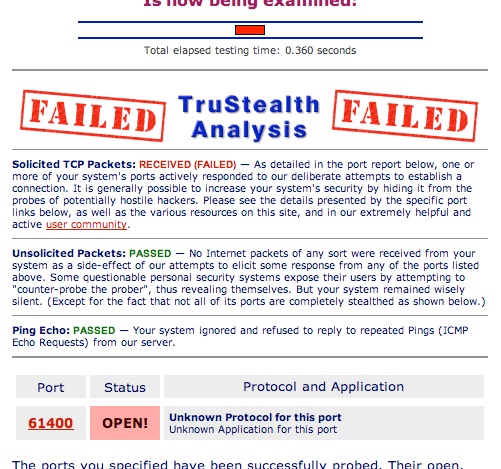
If the port status is shown as “Stealth”, then something like a firewall is in the way and is preventing any connection to the port from the internet, uAlertMe included. If the port status is shown as “Closed”, then it probably means that iAlertU isn’t running, or it’s server isn’t turned on or configured to use the right port.
